How to Create Floor Plans from Handheld LiDAR Scans
📋 Quick Summary:
- ✅ Handheld LiDAR: Fast, portable scanning for interior spaces
- ✅ Popular devices: SatLab, GeoSLAM, BLK2GO, NavVis
- ✅ Workflow: Scan → Register → Export → Convert to CAD (2-4 hours total)
- ✅ Best for: Interior as-built documentation, facility management, quick surveys
- ✅ Format support: E57, LAS, PLY - all work with ScanToBIM-CAD
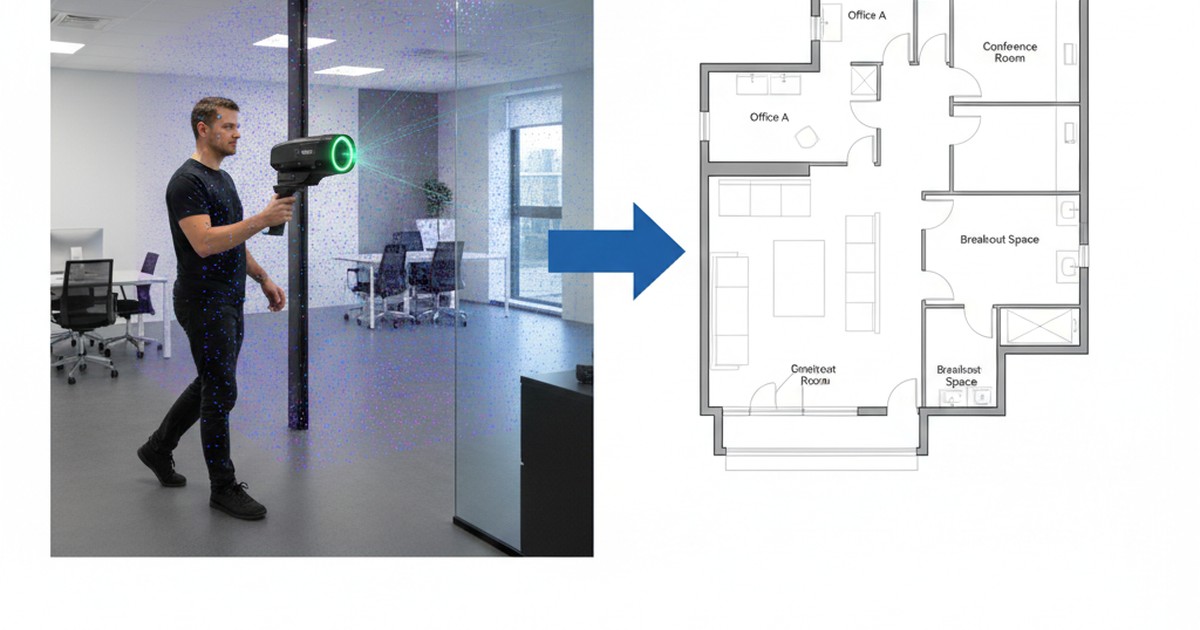
Handheld LiDAR scanners have revolutionized interior scanning workflows. Unlike traditional tripod-mounted scanners that require stopping at each position, handheld devices let you walk through a building while continuously capturing millions of 3D points. The result? Faster scanning times, easier data collection, and the same high-quality point clouds needed for accurate floor plan creation.
But once you've captured that handheld scan, how do you turn it into a usable floor plan? In this comprehensive guide, we'll walk through everything you need to know about creating floor plans from handheld LiDAR scans—from choosing the right device to exporting your final CAD files.
What is Handheld LiDAR Scanning?
Handheld LiDAR scanning (also called mobile or portable LiDAR) uses a compact, battery-powered scanner that you carry while walking through a space. The scanner continuously captures 3D point cloud data as you move, using simultaneous localization and mapping (SLAM) technology to track its position and orientation in real-time.
How SLAM Works:
- ✅ Scanner uses LiDAR sensors to measure distances to surfaces
- ✅ IMU (Inertial Measurement Unit) tracks movement and orientation
- ✅ SLAM algorithm combines sensor data to build a 3D map in real-time
- ✅ No targets or markers needed—the scanner self-localizes
- ✅ Results in a registered point cloud ready for processing
Unlike tripod scanners that capture from fixed positions, handheld scanners are designed for continuous motion. You simply walk through the space at a normal pace (typically 1-2 meters per second), and the scanner does the rest.
Key Advantages of Handheld LiDAR
⚡ Speed
Scan a 500m² office in 15-20 minutes vs 2-3 hours with tripod scanner
📦 Portability
Lightweight (2-5kg), battery-powered, no tripod setup required
👥 Accessibility
Easier to use—minimal training compared to tripod scanners
💰 Cost-Effective
Lower initial investment ($20k-$60k vs $50k-$150k for tripod scanners)
Limitations of Handheld LiDAR
Handheld scanners excel at interior spaces, but have some limitations:
- Interior-focused: Best for indoor spaces; outdoor scanning requires good lighting and stable conditions
- Accuracy: Typically ±2-5cm accuracy (tripod scanners achieve ±1-2cm)
- Range: Effective range of 20-100m (vs 100-300m for tripod scanners)
- Complex geometries: May struggle with very large open spaces or highly reflective surfaces
⚠️ Best Use Cases: Handheld LiDAR is ideal for interior as-built documentation, facility management, renovation projects, and quick surveys. For survey-grade exterior work or very high-precision requirements, tripod scanners may be better suited.
Handheld vs Tripod Laser Scanners: When to Use Each
Both handheld and tripod scanners have their place. Here's when to choose each:
| Factor | Handheld LiDAR | Tripod Scanner |
|---|---|---|
| Scanning Speed | ✅ Very Fast (15-20 min for 500m²) | Slower (2-3 hours for 500m²) |
| Accuracy | ±2-5cm | ✅ ±1-2cm (higher precision) |
| Setup Time | ✅ Minimal (just start walking) | 5-10 min per scan position |
| Portability | ✅ Lightweight, battery-powered | Heavy, requires tripod, AC power |
| Best For | Interior spaces, quick surveys | ✅ Exterior, high-precision, large areas |
| Cost | $20k-$60k | $50k-$150k |
| Training Required | ✅ Minimal (1-2 days) | Moderate (1-2 weeks) |
Decision Guide: Handheld vs Tripod
✅ Choose Handheld If:
- Interior as-built documentation
- Quick turnaround needed
- Multiple small-to-medium projects
- Limited budget
- Minimal training time available
- Facility management surveys
✅ Choose Tripod If:
- Survey-grade precision required
- Exterior scanning projects
- Very large areas (stadiums, warehouses)
- Long-range scanning needed
- Complex registration requirements
- Legal/survey documentation
Popular Handheld LiDAR Devices Overview
Several manufacturers offer handheld LiDAR scanners, each with different strengths. Here's an overview of the most popular options:
💡 Pricing Note: Prices listed are approximate ranges based on web research of dealer listings and vendor websites (as of January 2026). GeoSLAM ZEB Horizon and Leica BLK2GO prices were verified from multiple dealer sources. SatLab and NavVis prices are estimates based on market positioning. Prices may vary significantly depending on vendor, included accessories, warranty packages, regional pricing, configuration options, and whether purchasing new or used equipment. Always contact authorized dealers for current, accurate pricing.
1. SatLab SLAM

SatLab SLAM Scanner
- Price: ~$30k-$40k (estimated, contact dealers for current pricing)
- Accuracy: ±2-3cm
- Range: Up to 100m
- Weight: ~3kg
- Export formats: E57, LAS, PLY
- Best for: Interior scanning, facility management
SatLab's SLAM scanner is a popular choice for interior scanning workflows. It offers good accuracy for handheld scanning and exports in standard formats (E57, LAS, PLY) that work directly with ScanToBIM-CAD and other conversion tools.
2. GeoSLAM ZEB Series

GeoSLAM ZEB Horizon / ZEB Revo
- Price: ~$14k-$20k (verified from dealer listings)
- Accuracy: ±2-4cm
- Range: Up to 100m
- Weight: ~1.5-2kg (very lightweight!)
- Export formats: E57, LAS, PLY
- Best for: Fast interior surveys, multi-story buildings
GeoSLAM's ZEB series is known for its lightweight design and fast scanning capabilities. The ZEB Horizon is particularly popular for multi-story buildings and large interior spaces. GeoSLAM's processing software (GeoSLAM Hub) provides good registration and export options.
3. Leica BLK2GO

Leica BLK2GO
- Price: ~$21k-$30k (verified from dealer listings, varies by package)
- Accuracy: ±2-5cm
- Range: Up to 25m (indoor focus)
- Weight: ~1.1kg (extremely lightweight!)
- Export formats: E57, RCP (via Leica Cyclone)
- Best for: Small-to-medium interior spaces, quick scans
The BLK2GO is Leica's entry into handheld scanning. It's one of the lightest options available and integrates well with Leica's existing software ecosystem (Cyclone, CloudWorx). For floor plan export, you'll typically export from Cyclone to E57 format, which can then be converted to DXF using ScanToBIM-CAD.
4. NavVis VLX

NavVis VLX
- Price: ~$50k-$70k (estimated, contact dealers for current pricing)
- Accuracy: ±1-3cm (higher precision)
- Range: Up to 200m
- Weight: ~5kg
- Export formats: E57, LAS, PLY
- Best for: Large commercial spaces, high-accuracy requirements
NavVis VLX is a more premium option with higher accuracy and longer range. It's designed for large commercial and industrial spaces where precision matters. The VLX also captures panoramic images alongside point cloud data, which can be useful for documentation and visualization.
5. Other Handheld Options
- Faro Freestyle: Faro's handheld solution, integrates with Faro software ecosystem
- Trimble X7 (with handheld mode): Can be used in handheld mode for faster scanning
- iPhone/iPad LiDAR: Consumer-grade option for basic scanning (lower accuracy, but very accessible)
Typical Workflow: From Scan to CAD
Creating floor plans from handheld LiDAR scans follows a consistent workflow. Here's the step-by-step process:
Step 1: Field Scanning (15-30 Minutes)
Begin by scanning the space with your handheld device:
- Prepare the scanner: Charge battery, check storage space, calibrate if needed
- Plan your route: Walk through the space systematically (e.g., start at entrance, follow perimeter, then interior rooms)
- Start scanning: Begin recording and walk at normal pace (1-2 m/s)
- Cover all areas: Ensure you scan all rooms, corridors, and important spaces
- Close loops: Return to starting point or overlap with previous path to help registration
- Stop recording: End scan when complete
💡 Pro Tips for Better Scans:
- Walk at consistent speed (don't rush or stop suddenly)
- Keep scanner level and steady
- Close loops by returning to starting point
- Scan important features (doors, windows) from multiple angles
- For multi-story buildings, scan each floor separately
Step 2: Data Transfer and Initial Processing (10-20 Minutes)
After scanning, transfer data to your computer and run initial processing:
- Transfer scan data: Connect scanner to computer or use manufacturer's software to download
- Open in processing software: Use manufacturer's software (GeoSLAM Hub, Leica Cyclone, etc.)
- Run SLAM processing: Software processes IMU and LiDAR data to create registered point cloud
- Review quality: Check for gaps, registration errors, or missing areas
- Clean if needed: Remove noise, outliers, or unwanted objects
Processing time varies by device and software, but typically takes 10-30 minutes for a 500m² scan.
Step 3: Export Point Cloud (5-10 Minutes)
Export your processed point cloud in a format compatible with CAD conversion:
- E57 format: Industry standard, preserves metadata (recommended)
- LAS format: LiDAR standard, good compression with LAZ
- PLY format: Simple format, widely supported
✅ Format Compatibility: ScanToBIM-CAD accepts all three formats (E57, LAS, PLY) directly—no ReCap conversion needed! This saves you time and the cost of a ReCap Pro license ($405/year).
Export settings to consider:
- Point density: For floor plans, 1-5mm spacing is typically sufficient
- Color data: Include RGB if available (helps with AI detection)
- File size: For large buildings, consider splitting by floor
Step 4: Convert to Floor Plan (2-4 Minutes)
Now convert your point cloud to a floor plan using AI-powered tools:
- Upload to ScanToBIM-CAD: Go to ScanToBIM-CAD and create a free account
- Upload your file: Drag and drop your E57, LAS, or PLY file (no format conversion needed!)
- AI processing: Wait 1-3 minutes while AI detects walls, doors, and windows
- Review results: Check the 3D viewer to verify detection quality
- Download files: Get both DXF (2D floor plan) and IFC (3D BIM model)
⚡ Time Savings: This automated conversion takes 2-4 minutes total, compared to 8-20 hours of manual tracing in AutoCAD or Revit. That's a 95%+ time reduction!
Step 5: Refine in CAD/BIM Software (1-3 Hours)
Import the downloaded DXF/IFC file into your BIM/CAD software (Revit, Archicad, AutoCAD, LibreCAD, etc.) for final refinement:
- Review AI detection: Check that walls, doors, and windows are correctly identified
- Fix any errors: Correct any AI mistakes (typically 5-10% of elements need minor adjustments)
- Add missing elements: Manually add anything the AI missed
- Add dimensions: Verify and add wall dimensions
- Add room labels: Label rooms and spaces
- Add annotations: Title block, north arrow, scale, etc.
- Final quality check: Compare against original point cloud
This refinement step typically takes 1-3 hours, compared to 8-20 hours of initial manual tracing. The AI does 90-95% of the work automatically.
Total Workflow Time
For a typical 500m² interior scan:
| Step | Time |
|---|---|
| Field Scanning | 15-30 minutes |
| Data Transfer & Processing | 10-20 minutes |
| Export Point Cloud | 5-10 minutes |
| AI Conversion (ScanToBIM-CAD) | 2-4 minutes |
| CAD Refinement | 1-3 hours |
| TOTAL | 2-4 hours |
Compare this to traditional manual tracing, which would take 8-20 hours for the same project!
Data Formats and Converter Tools
Handheld scanners export in various formats. Here's what you need to know:
Common Export Formats
E57 Format
- ✅ Industry standard
- ✅ Preserves metadata
- ✅ Includes color data
- ✅ Supported by ScanToBIM-CAD
LAS Format
- ✅ LiDAR standard
- ✅ Good compression (LAZ)
- ✅ Widely supported
- ✅ Supported by ScanToBIM-CAD
PLY Format
- ✅ Simple format
- ✅ Includes color
- ✅ Easy to work with
- ✅ Supported by ScanToBIM-CAD
Format Conversion Tools
If you need to convert between formats, here are common tools:
- CloudCompare: Free, open-source tool for format conversion (E57 ↔ LAS ↔ PLY)
- Manufacturer Software: GeoSLAM Hub, Leica Cyclone, etc. can export to multiple formats
- PDAL: Command-line tool for advanced conversions
- ScanToBIM-CAD: Accepts all formats directly—no conversion needed!
💡 Pro Tip: Most modern conversion tools (including ScanToBIM-CAD) accept E57, LAS, and PLY formats directly. You typically don't need to convert formats—just export from your scanner software in any of these formats and upload directly.
Accuracy and Best Practices
Getting accurate floor plans from handheld scans requires following best practices:
1. Scanning Best Practices
- Walk at consistent speed: 1-2 meters per second is optimal
- Keep scanner level: Avoid tilting or rotating rapidly
- Close loops: Return to starting point or overlap paths to improve registration
- Scan important features: Walk past doors and windows from multiple angles
- Avoid rapid movements: Sudden stops or direction changes can cause registration errors
- Ensure good coverage: Don't skip rooms or areas
2. Processing Best Practices
- Use manufacturer's software: Each scanner has optimized processing software
- Check registration quality: Look for gaps, misalignments, or duplicate geometry
- Clean point cloud: Remove noise, outliers, and unwanted objects before export
- Verify accuracy: Compare against known measurements if possible
- Export appropriate density: 1-5mm spacing is typically sufficient for floor plans
3. Conversion Best Practices
- Use AI-powered tools: Automated conversion is faster and more consistent than manual tracing
- Review AI results: Always check the generated floor plan against the point cloud
- Refine in CAD: Make final adjustments in your familiar CAD environment
- Verify dimensions: Check key measurements against the point cloud
- Add annotations: Room labels, dimensions, title blocks, etc.
Expected Accuracy
For handheld LiDAR scans converted to floor plans:
Typical Accuracy Ranges:
- Point cloud accuracy: ±2-5cm (depending on scanner and conditions)
- Floor plan accuracy: ±2-5cm (preserves point cloud accuracy)
- Wall position accuracy: ±1-3cm (AI detection is typically very accurate)
- Door/window accuracy: ±2-5cm (depends on scan quality and AI detection)
This accuracy is sufficient for most as-built documentation, facility management, and renovation design work. For survey-grade precision (±1cm), tripod scanners may be required.
Common Pitfalls and Troubleshooting
Here are common issues you might encounter and how to solve them:
Problem 1: Poor Registration (Gaps or Misalignments)
Symptoms: Point cloud has gaps, duplicate walls, or misaligned sections
Solutions:
- Re-process scan with different SLAM parameters
- Ensure you closed loops during scanning (returned to starting point)
- Check for rapid movements or stops that might confuse SLAM algorithm
- Use manufacturer's software optimization tools
- For severe issues, re-scan the problematic area
Problem 2: Missing Walls or Rooms
Symptoms: AI-generated floor plan is missing some walls or entire rooms
Solutions:
- Check point cloud density—ensure walls have adequate point coverage
- Verify scan coverage—make sure you scanned all areas
- Manually add missing elements in CAD software (still faster than full manual tracing)
- Re-process with different AI parameters if available
Problem 3: Incorrect Door/Window Detection
Symptoms: Doors or windows are missing, incorrectly positioned, or wrong size
Solutions:
- Check point cloud quality around openings—ensure good coverage
- Manually adjust door/window positions in CAD (quick fix)
- Verify scan captured openings from multiple angles
- Add missing doors/windows manually in CAD
Problem 4: Low Point Cloud Density
Symptoms: Sparse point cloud, difficult to identify features
Solutions:
- Walk slower during scanning (allows more points per area)
- Scan important areas multiple times
- Check scanner settings for point density/scan rate
- Use higher-quality scanning mode if available
Problem 5: Large File Sizes
Symptoms: Point cloud files are very large (several GB), slow to process
Solutions:
- Export with lower point density (1-5mm spacing is sufficient for floor plans)
- Split large buildings by floor into separate files
- Use compressed formats (LAZ instead of LAS, binary PLY instead of ASCII)
- Remove unnecessary data (exterior points if doing interior-only floor plan)
Problem 6: Accuracy Issues
Symptoms: Floor plan dimensions don't match known measurements
Solutions:
- Verify scanner calibration
- Check for registration errors in point cloud
- Compare against known measurements (door widths, room dimensions)
- Re-scan if accuracy is critical and errors are significant
- Consider using tripod scanner for higher-precision requirements
Real-World Example: Office Space Floor Plan
Let's walk through a real-world example:
📊 Project Details:
- Building Type: Office space
- Size: 400m² (4,300 sq ft)
- Scanner: GeoSLAM ZEB Horizon
- Complexity: 15 rooms, 12 doors, 8 windows
- Purpose: As-built documentation for renovation
Workflow Timeline
- Field scanning: 20 minutes (walked through entire space systematically)
- Data processing: 15 minutes (GeoSLAM Hub SLAM processing)
- Export to E57: 5 minutes
- AI conversion (ScanToBIM-CAD): 3 minutes
- CAD refinement: 2 hours (reviewed, added room labels, dimensions, title block)
- Total time: 2 hours 43 minutes
Results
The AI-generated floor plan was 95% complete—only minor adjustments were needed:
- ✅ All walls correctly detected and positioned
- ✅ 11 of 12 doors correctly identified (1 door needed manual adjustment)
- ✅ 7 of 8 windows correctly identified (1 window needed manual addition)
- ✅ Room boundaries accurate to within ±3cm
- ✅ Final floor plan delivered same day (vs 1-2 weeks with manual tracing)
💰 Cost Comparison:
- Manual tracing: 12 hours × $50/hour = $600
- AI-assisted workflow: 2.7 hours × $50/hour + $29 (ScanToBIM-CAD) = $164
- Savings: $436 (73% cost reduction)
Conclusion: Convert Your Handheld LiDAR Scan to Floor Plans in Minutes
Handheld LiDAR scanners have made interior scanning faster and more accessible than ever. Combined with AI-powered conversion tools like ScanToBIM-CAD, you can now create accurate floor plans in hours instead of weeks.
Key takeaways:
- ✅ Handheld scanners: Fast, portable, ideal for interior spaces
- ✅ Popular devices: SatLab, GeoSLAM, BLK2GO, NavVis all export standard formats
- ✅ Complete workflow: Scan → Process → Export → Convert → Refine (2-4 hours total)
- ✅ Format support: E57, LAS, PLY all work with ScanToBIM-CAD (no ReCap needed!)
- ✅ Time savings: 95% faster than manual tracing (2-4 hours vs 8-20 hours)
- ✅ Cost savings: 70-90% reduction compared to manual workflows
Ready to convert your handheld LiDAR scan to a floor plan? Try ScanToBIM-CAD free—upload your E57, LAS, or PLY file and get your floor plan in minutes. No credit card required, 2 free conversions to start.
Have questions about handheld scanning workflows? Check out our other guides on point cloud to floor plan conversion, point cloud formats, and as-built documentation workflows.
Ready to Convert Your Point Cloud?
Try ScanToBIM-CAD free and convert your first point cloud to a floor plan in minutes. No credit card required.
Start Free TrialRelated Posts
![How to Convert Point Cloud to Floor Plan [2026 Guide]](/_next/image?url=%2Fblog%2Fpoint-cloud-to-floor-plan%2Ffeatured.jpg&w=3840&q=75)
How to Convert Point Cloud to Floor Plan [2026 Guide]
Stop wasting 8+ hours manually tracing point clouds. Learn how to convert point clouds to floor plans in minutes using AI-powered automation. Compare manual vs automated methods and see real time and cost savings.

E57 vs LAS vs PLY: CloudCompare Supported Formats & Comparison
CloudCompare supports E57, LAS, LAZ, PLY, PCD and more. Compare these point cloud formats—which scanners use which, best for floor plans, and how to convert.

As-Built Floor Plans from Laser Scans: Complete Workflow
Create accurate as-built floor plans from laser scans in hours instead of weeks. Learn the complete workflow from field scanning to final CAD drawings, compare traditional vs modern AI-assisted methods, and see real cost savings.