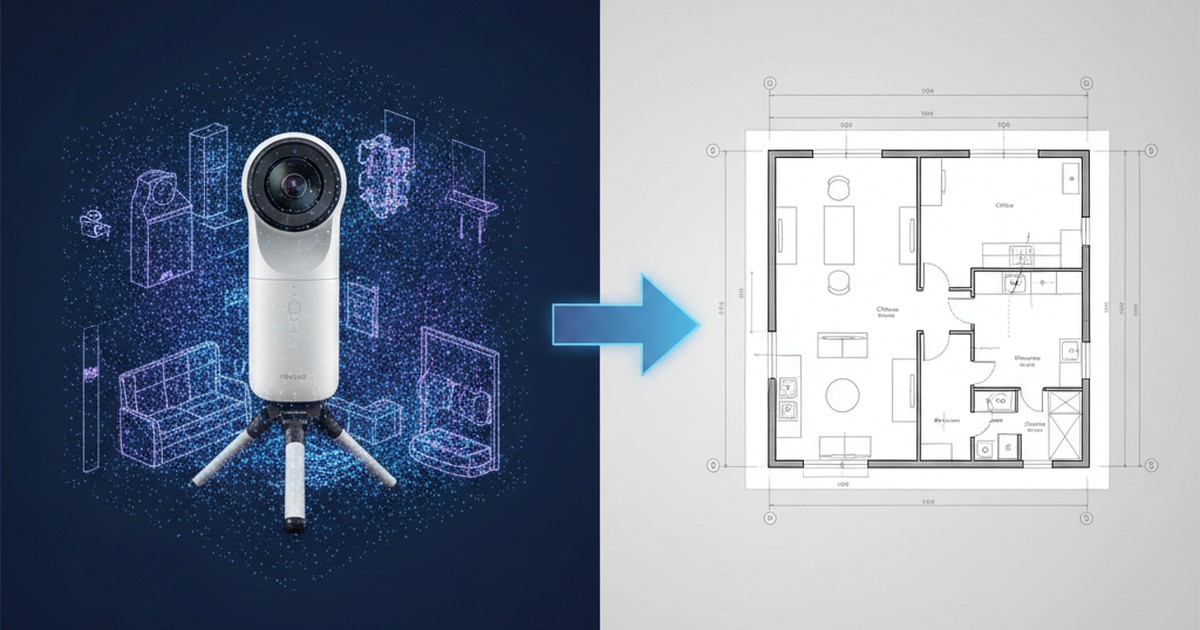
Convert Matterport to DXF/DWG: Automated Floor Plans & BIM (No Manual Tracing)
📋 Quick Summary:
- ✅ Matterport limitation: Built-in "Floor Plan" export is PNG only, not CAD format
- ✅ Solution 1: Export MatterPak (OBJ/E57), convert with ScanToBIM-CAD or import to AutoCAD/Revit for manual tracing
- ✅ Solution 2: Export E57 directly from Matterport, import to ScanToBIM-CAD for automated floor plan and BIM model
- ✅ Time savings: Automated conversion (3 minutes) vs manual tracing (8-20 hours)
- ✅ Best format: E57 preserves color and metadata, ideal for AI-powered conversion
Matterport has become the go-to platform for creating immersive 3D virtual tours and property documentation. With over 10 million spaces captured, Matterport scanners and the Matterport platform have revolutionized how real estate, architecture, and construction professionals document spaces. But there's one common frustration: Matterport's built-in "Floor Plan" export only gives you a PNG image, not a usable CAD or BIM file.
If you need a DXF, DWG, or IFC file for AutoCAD, Revit, or other CAD/BIM software, you're stuck. Or are you? In this guide, we'll show you exactly how to export DXF/DWG floor plans and IFC BIM models from your Matterport scans—using both Matterport's native export options and third-party conversion tools.
Why Matterport is So Popular for 3D Scans and Virtual Tours
Before diving into the conversion process, let's understand why Matterport has become so dominant in the 3D scanning space:
🌐 Virtual Tours
Create immersive, web-based 3D tours that work on any device—perfect for real estate, hospitality, and commercial properties
📱 Easy Scanning
Use Matterport Pro2 camera, iPhone/iPad with Matterport app, or third-party scanners—flexible hardware options
⚡ Fast Processing
Cloud-based processing automatically creates 3D models, floor plans, and virtual tours within hours
💰 Affordable
Subscription-based pricing ($49-$169/month) makes professional 3D scanning accessible to small businesses
Matterport excels at creating visual documentation and virtual tours. However, when you need technical CAD files for design, construction, or as-built documentation, the platform's limitations become apparent.
What File Formats Does Matterport Provide?
Matterport offers several export options, each suited for different purposes:
1. MatterPak (Complete 3D Data Package)
MatterPak is Matterport's comprehensive data export that includes:
- OBJ files: 3D mesh models with textures (one per floor/level)
- E57 files: Point cloud data in industry-standard E57 format
- Textures: High-resolution images mapped to the 3D model
- Metadata: Scan information, camera positions, etc.
💡 MatterPak Availability: MatterPak export is available on Matterport Pro and Business plans ($69+/month). Free and Starter plans don't include MatterPak export. You'll need to upgrade your subscription to access this feature.
2. E57 Point Cloud Export
Matterport can export point cloud data directly in E57 format, which is the industry standard for terrestrial laser scanning. This is the best option for CAD conversion because:
- ✅ Preserves color (RGB) data from the scan
- ✅ Includes intensity and metadata
- ✅ Compatible with all major CAD and point cloud software
- ✅ Works directly with ScanToBIM-CAD for automated floor plan generation
3. OBJ 3D Mesh Export
Matterport can export OBJ files (3D mesh models) which include:
- 3D geometry (vertices, faces)
- Texture mapping (UV coordinates)
- Material information
OBJ files can be converted to point clouds, but E57 is preferred for CAD workflows.
4. Floor Plan PNG Export
Matterport's built-in "Floor Plan" export creates a PNG image file showing:
- 2D top-down view of the space
- Room boundaries and labels
- Furniture and fixtures (optional)
- Scale and dimensions
⚠️ The Problem: This PNG export is just an image file—not a CAD file. You can't edit it in AutoCAD, Revit, or other CAD software. You can't extract measurements programmatically. You can't use it for construction documentation. It's essentially a "picture" of a floor plan, not an actual floor plan file.
5. Other Matterport Exports
- Virtual Tour Link: Web-based 3D tour (not a file format)
- 4K Images: High-resolution still images from scan positions
- Video Walkthrough: Pre-rendered video tour
- CAD Files: ❌ Not available—this is the gap we're solving!
Limitations of Matterport's Built-in "Floor Plan" Export
Matterport's PNG floor plan export has several critical limitations for CAD workflows:
| Requirement | PNG Export | DXF/DWG Export |
|---|---|---|
| File Format | ❌ Raster image (PNG) | ✅ Vector CAD file |
| Editable in CAD | ❌ No (image only) | ✅ Yes (full CAD editing) |
| Precise Measurements | ❌ Manual (from image scale) | ✅ Automatic (CAD dimensions) |
| Layer Organization | ❌ No layers | ✅ Walls, doors, windows on separate layers |
| Construction Documentation | ❌ Not suitable | ✅ Industry standard |
| BIM Integration | ❌ Cannot import | ✅ Import to Revit, Archicad, etc. |
| File Size | Large (raster image) | ✅ Small (vector data) |
For professional CAD workflows, you need a DXF or DWG file—not a PNG image. That's where the conversion process comes in.
Step-by-Step: How to Get DXF/DWG from a Matterport Scan
There are two main approaches to convert Matterport scans to DXF/DWG floor plans. We'll cover both:
Option 1: MatterPak + Conversion Tools (ScanToBIM-CAD or CAD Software)
This method uses Matterport's MatterPak export, then converts the point cloud to a floor plan:
⏱️ Time Estimate: 15-30 minutes (depending on scan size and processing time)
Step 1: Export MatterPak from Matterport
- Log in to your Matterport account
- Navigate to the space you want to export
- Click the "..." menu (three dots) in the top right
- Select "Export" → "MatterPak"
- Wait for Matterport to process and generate the MatterPak (typically 10-30 minutes)
- Download the ZIP file containing OBJ and E57 files
⚠️ Subscription Requirement: MatterPak export requires a Matterport Pro ($69/month) or Business ($169/month) subscription. Free and Starter plans don't include this feature.
Step 2: Extract E57 File from MatterPak
- Unzip the downloaded MatterPak ZIP file
- Locate the
.e57file(s) in the extracted folder - Note: MatterPak may include multiple E57 files (one per floor/level)
Step 3: Convert E57 to DXF/DWG
You have two options for conversion:
Option A: ScanToBIM-CAD (Recommended)
- Go to ScanToBIM-CAD and create a free account
- Upload your E57 file (drag and drop)
- Wait 1-3 minutes for AI processing
- Download DXF (2D floor plan) and IFC (3D BIM model)
✅ Fastest: 2-4 minutes total
Option B: CloudCompare + CAD Software (Manual)
- Download and install CloudCompare (free, open-source)
- Import E57 file into CloudCompare for viewing/processing
- Import point cloud into AutoCAD or Revit (requires CAD software license)
- Manually trace walls, doors, windows in CAD software
- Export to DXF/DWG from CAD software
⚠️ Time-consuming: 8-20 hours of manual tracing + requires AutoCAD/Revit ($2,000+/year)
⚠️ Important Note: CloudCompare by itself cannot export to DXF or BIM formats. It's a point cloud visualization and processing tool. To create DXF/DWG files, you need additional CAD software like AutoCAD or Revit to manually trace the point cloud. This is why automated solutions like ScanToBIM-CAD are much faster and more cost-effective.
Option 2: Export E57 Directly, Import to ScanToBIM-CAD (Fastest Method)
If Matterport offers direct E57 export (available on some plans), this is the fastest path:
⏱️ Time Estimate: 3-5 minutes total (fastest method!)
Step 1: Export E57 from Matterport
- Log in to your Matterport account
- Navigate to your space
- Click "..." menu → "Export"
- Select "E57 Point Cloud" (if available on your plan)
- Download the E57 file
💡 E57 Export Availability: Direct E57 export may be available on Matterport Pro and Business plans. If you don't see this option, use Option 1 (MatterPak) instead.
Step 2: Upload to ScanToBIM-CAD
- Go to ScanToBIM-CAD and sign in
- Click "Upload New Scan"
- Drag and drop your E57 file (or click to browse)
- Wait for upload to complete
Step 3: AI Processing
- ScanToBIM-CAD automatically detects walls, doors, and windows using AI
- Processing typically takes 1-3 minutes (depending on file size)
- You'll see a 3D preview of the detected elements
Step 4: Review and Download
- Review the 3D viewer to verify detection quality
- If needed, adjust detection parameters (advanced options)
- Click "Download DXF" for 2D floor plan
- Click "Download IFC" for 3D BIM model (optional)
✅ Result: You now have a professional DXF file with:
- ✅ Walls on separate layers
- ✅ Doors and windows detected and positioned
- ✅ Accurate dimensions
- ✅ Ready to import into AutoCAD, Revit, or any CAD software
Detailed Screenshots or Video Walk-through
For visual learners, here's what the process looks like:
📹 Video Tutorial: A step-by-step video walkthrough would be ideal here. For now, the text instructions above should guide you through the process. If you encounter issues, check the troubleshooting section below.
Comparison Table: Manual Tracing vs Automated DXF Export
Let's compare the two main approaches to getting DXF files from Matterport scans:
| Factor | Manual Tracing (AutoCAD/Revit) | Automated (ScanToBIM-CAD) |
|---|---|---|
| Time Required | 8-20 hours | ✅ 2-4 minutes |
| Cost | $400-$1,000 (labor) | ✅ $29/month (multiple conversions) |
| Accuracy | ±1-2cm (manual precision) | ✅ ±2-5cm (AI detection) |
| Consistency | ❌ Varies by operator | ✅ Consistent results |
| Door/Window Detection | Manual (time-consuming) | ✅ Automatic AI detection |
| Skill Required | High (CAD expertise needed) | ✅ Low (upload and download) |
| Software Required | CloudCompare (free) + AutoCAD/Revit ($2,000+/year) | ✅ Web browser only |
| 3D BIM Model | ❌ Not included | ✅ IFC file included (ready for Revit import) |
| Scalability | ❌ Limited (one at a time) | ✅ Unlimited conversions |
💰 Cost Comparison Example:
- Manual tracing: 12 hours × $50/hour = $600 per project
- Automated (ScanToBIM-CAD): 3 minutes + $29/month = $29 per project (multiple conversions/month)
- Savings: $571 (95% cost reduction) for single project, even more for multiple projects
Common Issues and Troubleshooting
Here are common problems you might encounter when converting Matterport scans to DXF, and how to solve them:
Issue 1: Distorted Geometry
Symptoms: Walls appear curved, rooms are misshapen, dimensions are incorrect
Causes & Solutions:
- Poor scan coverage: Matterport scans may have gaps or incomplete coverage. Solution: Ensure you captured all areas during scanning, or re-scan missing sections
- Registration errors: Multiple scan positions weren't properly aligned. Solution: Matterport's cloud processing usually handles this, but if issues persist, try re-processing the scan in Matterport
- Scale issues: Point cloud may not be properly scaled. Solution: ScanToBIM-CAD automatically detects scale, but you can verify dimensions in the 3D viewer
Issue 2: Incomplete Scans
Symptoms: Missing rooms, partial walls, gaps in floor plan
Causes & Solutions:
- Insufficient scan positions: Didn't capture all areas during Matterport scanning. Solution: Re-scan missing areas and merge with existing scan, or manually add missing elements in CAD
- Obstructions: Furniture or objects blocked walls. Solution: Remove obstructions and re-scan, or manually trace from point cloud in CAD
- Low point density: Sparse point cloud makes detection difficult. Solution: Use higher-quality Matterport scanning settings, or manually add missing elements
Issue 3: Conversion Settings
Symptoms: AI detection misses walls, incorrect door/window positions, too many or too few elements detected
Solutions:
- Review and refine: Always review AI results in the 3D viewer before downloading—you can make manual adjustments in CAD afterward
- Point cloud quality: Ensure your E57 export includes color data (RGB)—this helps AI detection accuracy
- File size: Very large files (>2GB) may need to be split by floor/level for better processing
Issue 4: MatterPak Export Not Available
Symptoms: "Export" menu doesn't show MatterPak option
Solution: MatterPak export requires a Matterport Pro ($69/month) or Business ($169/month) subscription. Free and Starter plans don't include this feature. You'll need to upgrade your subscription to access MatterPak exports.
Issue 5: E57 File Too Large
Symptoms: Upload fails, processing is slow, browser crashes
Solutions:
- Split by floor: If MatterPak includes multiple E57 files (one per floor), process them separately
- Reduce point density: Export E57 with lower point density (if Matterport allows this setting)
- Check file size: ScanToBIM-CAD supports files up to 2GB. For larger files, contact support or split the scan
- Use compressed format: E57 files are already compressed, but ensure you're not exporting unnecessary data
Tips for Best Results
Follow these best practices to get the best DXF floor plans from your Matterport scans:
1. Ensure Complete Scan Coverage
- ✅ Scan all rooms and areas systematically
- ✅ Don't skip closets, bathrooms, or small spaces
- ✅ Capture multiple angles of important features (doors, windows)
- ✅ Ensure good overlap between scan positions
2. Use E57 Format When Available
- ✅ E57 preserves color (RGB) data, which improves AI detection accuracy
- ✅ E57 includes metadata and intensity information
- ✅ E57 is the industry standard—most compatible with conversion tools
- ✅ Prefer E57 over OBJ for CAD conversion workflows
3. Verify Scan Quality Before Export
- ✅ Review the Matterport 3D model for gaps or errors
- ✅ Check that all rooms are properly captured
- ✅ Verify dimensions match known measurements (door widths, room sizes)
- ✅ Fix any registration issues in Matterport before exporting
4. Process Each Floor Separately
- ✅ If you have a multi-story building, export and process each floor as a separate E57 file
- ✅ This improves processing speed and accuracy
- ✅ You can combine floor plans in CAD software afterward
5. Review AI Results Before Finalizing
- ✅ Always check the 3D viewer in ScanToBIM-CAD before downloading
- ✅ Verify that walls, doors, and windows are correctly detected
- ✅ Make note of any elements that need manual adjustment in CAD
- ✅ Remember: AI does 90-95% of the work—minor manual fixes are normal
6. Refine in CAD Software
- ✅ Import DXF into your CAD software (AutoCAD, Revit, LibreCAD, etc.)
- ✅ Add room labels, dimensions, and annotations
- ✅ Fix any AI detection errors (typically 5-10% of elements)
- ✅ Add title block, north arrow, and other standard CAD elements
Conclusion: Export Your Matterport Scans to DXF Floor Plans in 3 Minutes
Matterport excels at creating virtual tours and visual documentation, but when you need CAD files for design and construction, the built-in PNG export isn't enough. Fortunately, converting Matterport scans to DXF/DWG floor plans is straightforward with the right tools.
Key takeaways:
- ✅ Matterport limitation: Built-in "Floor Plan" export is PNG only—not a CAD file
- ✅ Solution: Export MatterPak (E57) or direct E57 export, then convert with ScanToBIM-CAD
- ✅ Time savings: Automated conversion (3 minutes) vs manual tracing (8-20 hours)
- ✅ Cost savings: 85-95% reduction compared to manual workflows
- ✅ Best format: E57 preserves color and metadata, ideal for AI-powered conversion
- ✅ Result: Professional DXF files ready for AutoCAD, Revit, or any CAD software
Ready to convert your Matterport scan to a DXF floor plan? Try ScanToBIM-CAD free—upload your Matterport E57 file and get your floor plan in minutes. No credit card required, 2 free conversions to start.
Have questions about Matterport workflows? Check out our other guides on point cloud to floor plan conversion, handheld LiDAR scanning, and point cloud formats.
Ready to Convert Your Point Cloud?
Try ScanToBIM-CAD free and convert your first point cloud to a floor plan in minutes. No credit card required.
Start Free TrialRelated Posts
![How to Convert Point Cloud to Floor Plan [2026 Guide]](/_next/image?url=%2Fblog%2Fpoint-cloud-to-floor-plan%2Ffeatured.jpg&w=3840&q=75)
How to Convert Point Cloud to Floor Plan [2026 Guide]
Stop wasting 8+ hours manually tracing point clouds. Learn how to convert point clouds to floor plans in minutes using AI-powered automation. Compare manual vs automated methods and see real time and cost savings.

How to Create Floor Plans from Handheld LiDAR Scans
Learn how to create accurate floor plans from handheld LiDAR scans. Compare handheld vs tripod scanners, explore popular devices (SatLab, GeoSLAM, BLK2GO, NavVis), and master the complete workflow from scan to CAD. Includes best practices and troubleshooting tips.

E57 vs LAS vs PLY: CloudCompare Supported Formats & Comparison
CloudCompare supports E57, LAS, LAZ, PLY, PCD and more. Compare these point cloud formats—which scanners use which, best for floor plans, and how to convert.